Tuesday, October 24, 2017

HOWTO access AWS resources inside a private VPC

Sorry, no screenshots. I just encountered this problem in my work, and creating screenshots will redo the entire thing. :)

Scenario
Your AWS resources is inside a private VPC that's inaccessible from the outside world. In our specific case, we have Lambda functions located inside a VPC together with ElastiCache. I needed a way to load data into ElastiCache.

Solution (note: this is not be step by step, I'm just recreating the required components; there's probably a wizard for this or something).

  1. In the VPC page, create a VPC. Let's name this vpc-111
  2. Create an Internet Gateway. Let's name this igw-12345.
  3. Create a subnet for igw-12345 and in your Route Table, point 0.0.0.0/0 to igw-12345. Let's name this subnet subnet-2468.
  4. Launch an EC2 instance and put it inside vpc-111. Enable public IP auto-assignment. Select subnet-2468 for your instance.
  5. Launch your EC2 instance.
  6. You can now access the AWS resources inside the instance or you can use SSH tunneling to access them from your workstation.
  7. Enjoy!

Saturday, July 22, 2017

How to let Apache Nutch index the results via ElasticSearch over REST API.

In my work, we used Apache Nutch to fetch and parse some data from various websites. The data is pretty huge, so we need to index this on ElasticSearch. In my initial prototypes, I discovered that we can't use AWS ElasticSearch because AWS doesn't expose the native transport protocol; we can only talk to it via its RESTful API. In the official Nutch releases (v2.3.1 and v1.13, as of July 22, 2017), the plugin for ES doesn't support the RESTful API. When I checked the source code though, I was quite surprised that there's another plugin for this. Unfortunately, there's zero documentation on this, so I wish these notes would help others. Note: the URL regex config and HTTP options need to be set too, the IP addresses need to be whitelisted, etc... just leave a comment in case I miss something.

OS used for this experiment: Ubuntu 16.04.2 LTS

Install Java

add-apt-repository ppa:webupd8team/java
apt-get update
apt-get install oracle-java8-installer

Install ant

apt-get install ant

Increase the ulimit settings

(TODO: these settings should survive a reboot; just edit /etc/sysctl.conf or something)
ulimit  -f unlimited \
        -t unlimited \
        -v unlimited \
        -n 64000 \
        -m unlimited \
        -u 64000

Install Apache Nutch

Download the source code

git clone https://github.com/apache/nutch.git

Build

ant clean runtime

Put this inside runtime/local/config/nutch-site.xml:
<?xml version="1.0"?>
<?xml-stylesheet type="text/xsl" href="configuration.xsl"?>

<configuration>
  <property>
    <name>http.agent.name</name>
    <value>Spiderman</value>
  </property>

  <property>
    <name>plugin.includes</name>
    <value>protocol-(http|httpclient)|urlfilter-regex|index-(basic|more)|query-(basic|site|url|lang)|indexer-elastic|indexer-elastic-rest|nutch-extensionpoints|parse-(text|html|msexcel|msword|mspowerpoint|pdf)|summary-basic|scoring-opic|urlnormalizer-(pass|regex|basic)|parse-(html|tika|metatags)|index-(basic|anchor|more|metadata)</value>
  </property>

  <property>
    <name>parser.character.encoding.default</name>
    <value>utf-8</value>
  </property>

  <property>
    <name>elastic.rest.host</name>
    <value>aws-elastic-search-endpoint.example.org</value>
  </property>

  <property>
    <name>elastic.rest.port</name>
    <value>443</value>
  </property>

  <property>
    <name>elastic.rest.index</name>
    <value>nutch</value>
  </property>

  <property>
    <name>elastic.rest.type</name>
    <value>doc</value>
  </property>

  <property>
    <name>elastic.rest.https</name>
    <value>true</value>
  </property>

  <property>
    <name>elastic.rest.trustallhostnames</name>
    <value>false</value>
  </property>

</configuration>

Make sure to whitelist your IP address first in AWS ElasticSearch’s policy settings. Yikes it's 7:11AM now... need to sleep. Hahaha... :p

Thursday, July 13, 2017

Setting up Apache Nutch v2.3.1 on Ubuntu with MongoDB and ElasticSearch

These are my notes for installing Apache Nutch v2.3.1 on Ubuntu in my work. We'll probably not use Nutch 2.3 because AWS ElasticSearch doesn't support the native transport protocol (it only supports the REST API, and it exposes it in a non-standard manner on port 80); thus we'll have a hard time indexing the data unless we maintain the servers ourselves. We can probably use AWS CloudSearch, but Nutch 2.3 doesn't have a plugin for it, unlike Nutch 1.13.

Anyway, there are lots of similar HOWTOs out there, but this one points to specific versions and URLs so you can just copy and paste these to get your system up and running in a few minutes.

OS used for this experiment: Ubuntu 16.04.2 LTS

Make sure that Ubuntu is the latest version

apt-get update
apt-get dist-upgrade
reboot #if necessary

Updating to the latest version is needed to fix the glibc bug that affects MongoDB. It’s probably not required anymore, but it’s good to be safe.

Install Java

add-apt-repository ppa:webupd8team/java
apt-get update
apt-get install oracle-java8-installer

Install ant

apt-get install ant

Increase the ulimit settings

(TODO: these settings should survive a reboot)
ulimit  -f unlimited \
        -t unlimited \
        -v unlimited \
        -n 64000 \
        -m unlimited \
        -u 64000

Install MongoDB

apt-key adv --keyserver hkp://keyserver.ubuntu.com:80 --recv 0C49F3730359A14518585931BC711F9BA15703C6

echo "deb [ arch=amd64,arm64 ] http://repo.mongodb.org/apt/ubuntu xenial/mongodb-org/3.4 multiverse" | sudo tee /etc/apt/sources.list.d/mongodb-org-3.4.list

apt-get update
apt-get install mongodb-org

service mongod start

echo "use nutch" | mongo

Install Apache Nutch

Download and extract

wget http://apache.cs.utah.edu/nutch/2.3.1/apache-nutch-2.3.1-src.tar.gz
tar xvf apache-nutch-2.3.1-src.tar.gz

Edit the configs

Uncomment this line at apache-nutch-2.3.1/ivy.xml:
<dependency org="org.apache.gora" name="gora-mongodb" rev="0.6.1" conf="*->default" />

Uncomment these lines at apache-nutch-2.3.1/runtime/local/conf/gora.properties:
gora.datastore.default=org.apache.gora.mongodb.store.MongoStore
gora.mongodb.override_hadoop_configuration=false
gora.mongodb.mapping.file=/gora-mongodb-mapping.xml
gora.mongodb.servers=localhost:27017
gora.mongodb.db=nutch

Build Apache Nutch

ant runtime #needs to be run in the top directory

Install ElasticSearch

Setup ElasticSearch on AWS
Create a new AWS ElasticSearch domain and whitelist the server(s) where Apache Nutch is installed. AWS ElasticSearch doesn’t support the native transport protocol (port 9300). We may be able to use AWS if Nutch supports the HTTP REST protocol. Needs more research.

Manual Installation
# It's possible to use the latest version, ES5, but you need to update the indexer.

wget -qO - https://packages.elastic.co/GPG-KEY-elasticsearch | sudo apt-key add -
echo "deb http://packages.elastic.co/elasticsearch/1.7/debian stable main" | sudo tee -a /etc/apt/sources.list.d/elasticsearch-1.7.list
apt-get update && sudo apt-get install elasticsearch

Edit /etc/elasticsearch/elasticsearch.yaml and put this:
network.host: 127.0.0.1
cluster.name: nutch
node.name: nutch1

Finish up
update-rc.d elasticsearch defaults
/etc/init.d/elasticsearch restart

Install Kibana (optional, didn't install this since curl works fine)

echo "deb http://packages.elastic.co/kibana/4.4/debian stable main" | sudo tee -a /etc/apt/sources.list.d/kibana-4.4.x.list

apt-get update && sudo apt-get install kibana

Put this inside apache-nutch-2.3.1/runtime/local/conf/nutch-site.xml

<?xml version="1.0"?>
<?xml-stylesheet type="text/xsl" href="configuration.xsl"?>

<configuration>
  <property>
    <name>storage.data.store.class</name>
    <value>org.apache.gora.mongodb.store.MongoStore</value>
    <description>Default class for storing data</description>
  </property>

  <property>
    <name>http.agent.name</name>
    <value>Spiderman</value>
  </property>

  <property>
    <name>plugin.includes</name>
    <value>protocol-(http|httpclient)|urlfilter-regex|index-(basic|more)|query-(basic|site|url|lang)|indexer-elastic|nutch-extensionpoints|parse-(text|html|msexcel|msword|mspowerpoint|pdf)|summary-basic|scoring-opic|urlnormalizer-(pass|regex|basic)|parse-(html|tika|metatags)|index-(basic|anchor|more|metadata)</value>
  </property>
  <property>
    <name>elastic.host</name>
    <value>127.0.0.1</value>
  </property>

  <property>
    <name>elastic.port</name>
    <value>9300</value>
  </property>

  <property>
    <name>elastic.cluster</name>
    <value>nutch</value>
  </property>

  <property>
    <name>elastic.index</name>
    <value>nutch</value>
  </property>

  <property>
    <name>parser.character.encoding.default</name>
    <value>utf-8</value>
  </property>

  <property>
    <name>http.content.limit</name>
    <value>6553600</value>
  </property>

  <property>
    <name>elastic.max.bulk.docs</name>
    <value>2000</value>
  </property>

  <property>
    <name>elastic.max.bulk.size</name>
    <value>2500500</value>
  </property>

</configuration>

Wednesday, July 05, 2017

Automatically scaling and deploying Server Density agent on AWS Elastic Beanstalk

We're using AWS ElasticBeanstalk in one of our projects at my work. EB is an abstraction on top of Elastic Load Balancing and EC2 (which is yet another abstraction on top of Xen, but I digress hehe...), and I really appreciate how it simplifies a lot of routine sysad tasks. EB allows us to scale the website up and down, depending on the traffic.

One problem that we encountered during development was a memory leak from PHP.  To prevent another downtime (or at least help predict when the servers are about to go offline), I decided to use Server Density to implement an early warning system that would give us a heads up when the server's memory is about to run out. Server Density is a pretty great service. We've been using it for quite some time now. Server Density works by letting you install an agent inside of your servers, and the agent will then continuously push metrics to their server. Server Density then collects all these logs and displays them into nice graphs. If a metric crosses the threshold in one of your conditions (i.e., if the CPU load is >= 90% or disk space is <= 5GB), Server Density then sends you notification via e-mail, SMS, and Slack.

The Server Density agent can be installed during each EB deployment by executing this inside your deployment script at .ebextensions/:

curl https://archive.serverdensity.com/agent-install.sh | bash -s -- -a ACCOUNTNAME -t PUTYOURKEYHERE -g GroupNameForYourEB -p amazon -i

Determining the amount of free memory in Linux is somewhat tricky. I can't use the memory usage metric to trigger a notification because Linux always shows that nearly all of the memory is being used, even though in reality they're just being used as cache. To get a more reliable metric, I used swap space instead. The theory is that the instances are supposed to have enough RAM for the tasks; when memory runs out, Linux uses the swap space as a last resort. Thus, we can check if swap space is >= 1MB to trigger a notification.

Next problem: since EB regularly deploys and terminates the instances, Server Density ends up monitoring servers that no longer exist. We needed a way to automatically stop Server Density from monitoring instances that have been terminated.

Solution: I made a CloudWatch rule that triggers whenever instances are stopped or terminated. The events are then pushed to a Lambda function which calls Server Density's API to remove the monitoring.

Here's the architecture that I came up with:
I think CloudWatch has a way to monitor the swap space, but the last time I checked, AWS SNS (a separate AWS service that sends notifications) can't send SMS messages to Philippine numbers so I can't wake up (not joking, unfortunately haha) whenever there are server problems.

Update: Turns out that Linux' default swappiness value is 60, which means that it will use swap ahead of time even though around half (or 80%? the docs have conflicting calculations) of the RAM is still available. To avoid this situation, set the swappiness to 1. You can even set it to 0 if you want:
sysctl vm.swappiness=1

Thursday, April 27, 2017

How to run AWS Lambda on VPC

I'm trying to run an AWS Lambda function inside a VPC because I need it to access ElastiCache. Problem: if you put a Lambda function inside a VPC, it loses Internet access. There are some few documentations online, but they are too complicated and they involve unnecessary steps. Here is the simplest way to run AWS Lambda inside VPC.

1. Create a simple NodeJS function that connects to an external site via HTTP:
'use strict';
const http = require('http');

exports.handler = (event, context, callback) => {
  http.get('http://www.google.com', res => {
    callback(null, `Success, with: ${res.statusCode}`);
  }).on('error', err => callback(`Error with: ${err.message}`));
};

2. Run the above function without a VPC to verify that it's working correctly (i.e., it returns an HTTP 200).

3. In the AWS Console, go to the VPC page and click "Elastic IPs". Then, click the "Allocate new address" button and select the "VPC" scope.


4. Next, go to the VPC Dashboard and click the "Start VPC Wizard" button.


5. Select VPC with Public and Private Subnets option.


6. In the next page, enter your "VPC name", and in the "Elastic IP Allocation ID" field, enter the Elastic IP that you created in Step 3. Click the "Create VPC" button.


7. Finally, go back to the Lambda page and configure your function. Click the "Configuration" tab and go to the "Advanced settings section". Select the VPC that you created in Step 5, and Select the private subnet that you created. This is important; otherwise outgoing Internet connections won't work.


8. Click the "Save and test" button to test your setup.  That's it! For a proper setup, use at least 2 subnets in different availability zones to run your function in high-availability mode.

Some SEO keywords to help other people: aws lambda run vpc nat gateway howto tutorial

Thursday, March 23, 2017

How to run arbitrary binary executables on AWS Lambda 6.10+

After posting the hack yesterday, AWS coincidentally released the Node.js 6.10 platform. The old method from 0.10 now works:

1. Create a bin/ directory inside your project directory.
2. Statically compile your binary as much as possible. Put it inside your bin/ directory. Put any shared libraries that it needs inside the bin/ directory too.
3. chmod +x bin/hello-world-binary
4. Do something like:

'use strict';

const exec = require('child_process').exec;

process.env['PATH'] = process.env['PATH'] + ':' + process.env['LAMBDA_TASK_ROOT'] + '/bin';
process.env['LD_LIBRARY_PATH'] = process.env['LAMBDA_TASK_ROOT'] + '/bin';

exports.handler = (event, context, callback) => {
    const cmd = 'hello-world-binary';
    const child = exec(cmd, (error) => {
        callback(error, 'Process complete!');
    });

    child.stdout.on('data', console.log);
    child.stderr.on('data', console.error);
};

5. ZIP your project directory and upload to AWS Lambda. Enjoy!

Wednesday, March 22, 2017

How to run arbitrary binary executables on AWS Lambda 4.3+

I've been enjoying AWS Lambda in my work lately. I appreciate how we can create serverless architecture (or nearly serverless, anyway) on the AWS Platform. Yeah, it's fun to set up Linux and/or FreeBSD servers myself, but oftentimes, this "cloud" thingy makes perfect sense in many scenarios.

Anyway, AWS Lambda has various constraints, such as not being able to install packages yourself. These constraints, according to their documentation, allows them to "perform operational and administrative activities on [our] behalf, including provisioning capacity, monitoring fleet health, applying security patches, deploying [our] code, and monitoring and logging [our] Lambda functions."

OK, fine; but how do you deal with code that depends on an external binary? In previous versions of the Lambda platform (Node.js v0.10), you can do this by statically compiling your binary and by putting it inside the bin/ folder inside your project and, by doing something like:

process.env['PATH'] = process.env['PATH'] + ':' + process.env['LAMBDA_TASK_ROOT'] + '/bin';
process.env['LD_LIBRARY_PATH'] = process.env['LAMBDA_TASK_ROOT'] + '/bin';

exec('hello-world-binary', function () {});

With the recent update, however, the above code no longer works. On AWS Lambda platform that uses Node.js v4.3+, we'd need to copy all the binaries to the /tmp folder, chmod +x it, and run it from there.

I couldn't find a cleaner solution, so I just wrapped these in a Node.js package:

https://www.npmjs.com/package/lambda_exec

Enjoy!

Monday, December 05, 2016

Disabling WoSign and StartCom from list of trusted CAs

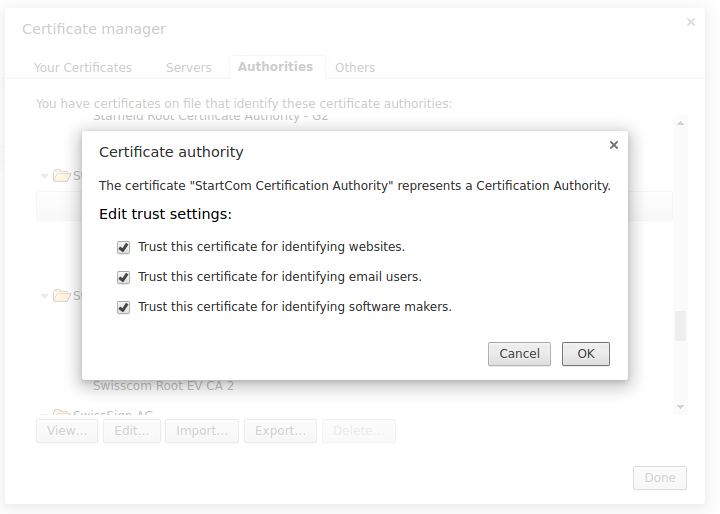
I was setting up an OpenVPN server a while ago. To remove the browser warning on its WebGUI, I used a free certificate from StartSSL because it's more straightforward than Let's Encrypt. As I was setting up the certificate though, I encountered a couple of articles warning the community about StartSSL. You can read more about it here.

Since WoSign and StartCom are no longer trustworthy, I manually removed them from my browsers:


At least the chance of being snooped upon by Chinese state hackers is slightly lessened now.

Monday, November 28, 2016

STARTTLS with Let's Encrypt and PowerMTA

This is an update to my previous post. I tried using the same certificate to let PowerMTA secure our e-mail server using STARTTLS, but unfortunately, Let's Encrypt is still untrusted by our PHP front-end because Let's Encrypt is still a new certificate authority. The solution is to include IdentTrust's root certificate as it's already trusted by all clients.

This setup is specific to a server with Apache and PowerMTA. You can probably make this work without a web server. Simply adjust the paths and other things as necessary.

I'm pasting the previous steps in this post with some updates.

First, log in as root. It's supposed to be a bad practice to work directly on root, but what the heck:

# sudo su -

Then, download GetSSL to your box:

# mkdir -p /root/getssl /etc/letsencrypt

# cd /root/getssl

# curl -s https://raw.githubusercontent.com/srvrco/getssl/master/getssl > getssl

# chmod 700 getssl

Then, generate the default config files:

# ./getssl -c example.org 
Making domain directory - /root/.getssl/example.org 
creating domain config file in /root/.getssl/example.org/getssl.cfg

Edit the global config at: ~/.getssl/getssl.cfg. Pay particular attention to the followine line:
RELOAD_CMD="service httpd reload"

Depending on your system, it can be "service apache2 reload" or something similar. Update as necessary.

Uncomment the following line also:
CA="https://acme-v01.api.letsencrypt.org"

WARNING: The server has a limit of 5 certificates per 7 days, so use the staging server when experimenting. I hit the limit when writing this post. Lolz.

Edit the domain config at ~/.getssl/example.org/getssl.cfg and insert the following lines:

SANS=www.example.org
DOMAIN_KEY_CERT_LOCATION=/etc/letsencrypt/example.org.crt
SERVER_TYPE="https"
CHECK_REMOTE="true"
ACL=('/var/www/pub/.well-known/acme-challenge')
USE_SINGLE_ACL="true"

Adjust the paths as necessary.

The ACL variable above is the path for the Automatic Certificate Management Environment (ACME) challenge. It should point to a folder inside your web server's document root and should be accessible to the public via HTTP. The ACME challenge is used to prove that you control the web server.

Next, edit the Apache config and insert this in your SSL section:

Header always set Strict-Transport-Security "max-age=15768000"
SSLProtocol             all -SSLv2 -SSLv3
SSLCipherSuite          ECDHE-ECDSA-CHACHA20-POLY1305:ECDHE-RSA-CHACHA20-POLY1305:ECDHE-ECDSA-AES128-GCM-SHA256:ECDHE-RSA-AES128-GCM-SHA256:ECDHE-ECDSA-AES256-GCM-SHA384:ECDHE-RSA-AES256-GCM-SHA384:DHE-RSA-AES128-GCM-SHA256:DHE-RSA-AES256-GCM-SHA384:ECDHE-ECDSA-AES128-SHA256:ECDHE-RSA-AES128-SHA256:ECDHE-ECDSA-AES128-SHA:ECDHE-RSA-AES256-SHA384:ECDHE-RSA-AES128-SHA:ECDHE-ECDSA-AES256-SHA384:ECDHE-ECDSA-AES256-SHA:ECDHE-RSA-AES256-SHA:DHE-RSA-AES128-SHA256:DHE-RSA-AES128-SHA:DHE-RSA-AES256-SHA256:DHE-RSA-AES256-SHA:ECDHE-ECDSA-DES-CBC3-SHA:ECDHE-RSA-DES-CBC3-SHA:EDH-RSA-DES-CBC3-SHA:AES128-GCM-SHA256:AES256-GCM-SHA384:AES128-SHA256:AES256-SHA256:AES128-SHA:AES256-SHA:DES-CBC3-SHA:!DSS
SSLHonorCipherOrder     on
SSLCertificateFile /etc/letsencrypt/example.org.crt
SSLCertificateChainFile /etc/letsencrypt/le.crt

Manually download Let's Encrypt's certificate:

# curl -s https://letsencrypt.org/certs/lets-encrypt-x3-cross-signed.pem > /etc/letsencrypt/le.crt


Next, we need to merge IdenTrust's root certificate with Let's Encrypt's. Open your browser and go to: https://www.identrust.com/certificates/trustid/root-download-x3.html

Then, edit /etc/letsencrypt/le.crt and paste IdenTrust's cert at the bottom of the cert. le.crt should look like:

-----BEGIN CERTIFICATE-----
MIIEkjCCA3qgAwIBAgIQCgFBQgAAAVOFc2oLheynCDANBgkqhkiG9w0BAQsFADA/
MSQwIgYDVQQKExtEaWdpdGFsIFNpZ25hdHVyZSBUcnVzdCBDby4xFzAVBgNVBAMT
DkRTVCBSb290IENBIFgzMB4XDTE2MDMxNzE2NDA0NloXDTIxMDMxNzE2NDA0Nlow
SjELMAkGA1UEBhMCVVMxFjAUBgNVBAoTDUxldCdzIEVuY3J5cHQxIzAhBgNVBAMT
GkxldCdzIEVuY3J5cHQgQXV0aG9yaXR5IFgzMIIBIjANBgkqhkiG9w0BAQEFAAOC
AQ8AMIIBCgKCAQEAnNMM8FrlLke3cl03g7NoYzDq1zUmGSXhvb418XCSL7e4S0EF
q6meNQhY7LEqxGiHC6PjdeTm86dicbp5gWAf15Gan/PQeGdxyGkOlZHP/uaZ6WA8
SMx+yk13EiSdRxta67nsHjcAHJyse6cF6s5K671B5TaYucv9bTyWaN8jKkKQDIZ0
Z8h/pZq4UmEUEz9l6YKHy9v6Dlb2honzhT+Xhq+w3Brvaw2VFn3EK6BlspkENnWA
a6xK8xuQSXgvopZPKiAlKQTGdMDQMc2PMTiVFrqoM7hD8bEfwzB/onkxEz0tNvjj
/PIzark5McWvxI0NHWQWM6r6hCm21AvA2H3DkwIDAQABo4IBfTCCAXkwEgYDVR0T
AQH/BAgwBgEB/wIBADAOBgNVHQ8BAf8EBAMCAYYwfwYIKwYBBQUHAQEEczBxMDIG
CCsGAQUFBzABhiZodHRwOi8vaXNyZy50cnVzdGlkLm9jc3AuaWRlbnRydXN0LmNv
bTA7BggrBgEFBQcwAoYvaHR0cDovL2FwcHMuaWRlbnRydXN0LmNvbS9yb290cy9k
c3Ryb290Y2F4My5wN2MwHwYDVR0jBBgwFoAUxKexpHsscfrb4UuQdf/EFWCFiRAw
VAYDVR0gBE0wSzAIBgZngQwBAgEwPwYLKwYBBAGC3xMBAQEwMDAuBggrBgEFBQcC
ARYiaHR0cDovL2Nwcy5yb290LXgxLmxldHNlbmNyeXB0Lm9yZzA8BgNVHR8ENTAz
MDGgL6AthitodHRwOi8vY3JsLmlkZW50cnVzdC5jb20vRFNUUk9PVENBWDNDUkwu
Y3JsMB0GA1UdDgQWBBSoSmpjBH3duubRObemRWXv86jsoTANBgkqhkiG9w0BAQsF
AAOCAQEA3TPXEfNjWDjdGBX7CVW+dla5cEilaUcne8IkCJLxWh9KEik3JHRRHGJo
uM2VcGfl96S8TihRzZvoroed6ti6WqEBmtzw3Wodatg+VyOeph4EYpr/1wXKtx8/
wApIvJSwtmVi4MFU5aMqrSDE6ea73Mj2tcMyo5jMd6jmeWUHK8so/joWUoHOUgwu
X4Po1QYz+3dszkDqMp4fklxBwXRsW10KXzPMTZ+sOPAveyxindmjkW8lGy+QsRlG
PfZ+G6Z6h7mjem0Y+iWlkYcV4PIWL1iwBi8saCbGS5jN2p8M+X+Q7UNKEkROb3N6
KOqkqm57TH2H3eDJAkSnh6/DNFu0Qg==
-----END CERTIFICATE-----
-----BEGIN CERTIFICATE-----
MIIDSjCCAjKgAwIBAgIQRK+wgNajJ7qJMDmGLvhAazANBgkqhkiG9w0BAQUFADA/
MSQwIgYDVQQKExtEaWdpdGFsIFNpZ25hdHVyZSBUcnVzdCBDby4xFzAVBgNVBAMT
DkRTVCBSb290IENBIFgzMB4XDTAwMDkzMDIxMTIxOVoXDTIxMDkzMDE0MDExNVow
PzEkMCIGA1UEChMbRGlnaXRhbCBTaWduYXR1cmUgVHJ1c3QgQ28uMRcwFQYDVQQD
Ew5EU1QgUm9vdCBDQSBYMzCCASIwDQYJKoZIhvcNAQEBBQADggEPADCCAQoCggEB
AN+v6ZdQCINXtMxiZfaQguzH0yxrMMpb7NnDfcdAwRgUi+DoM3ZJKuM/IUmTrE4O
rz5Iy2Xu/NMhD2XSKtkyj4zl93ewEnu1lcCJo6m67XMuegwGMoOifooUMM0RoOEq
OLl5CjH9UL2AZd+3UWODyOKIYepLYYHsUmu5ouJLGiifSKOeDNoJjj4XLh7dIN9b
xiqKqy69cK3FCxolkHRyxXtqqzTWMIn/5WgTe1QLyNau7Fqckh49ZLOMxt+/yUFw
7BZy1SbsOFU5Q9D8/RhcQPGX69Wam40dutolucbY38EVAjqr2m7xPi71XAicPNaD
aeQQmxkqtilX4+U9m5/wAl0CAwEAAaNCMEAwDwYDVR0TAQH/BAUwAwEB/zAOBgNV
HQ8BAf8EBAMCAQYwHQYDVR0OBBYEFMSnsaR7LHH62+FLkHX/xBVghYkQMA0GCSqG
SIb3DQEBBQUAA4IBAQCjGiybFwBcqR7uKGY3Or+Dxz9LwwmglSBd49lZRNI+DT69
ikugdB/OEIKcdBodfpga3csTS7MgROSR6cz8faXbauX+5v3gTt23ADq1cEmv8uXr
AvHRAosZy5Q6XkjEGB5YGV8eAlrwDPGxrancWYaLbumR9YbK+rlmM6pZW87ipxZz
R8srzJmwN0jP41ZL9c8PDHIyh8bwRLtTcm1D9SZImlJnt1ir/md2cXjbDaJWFBM5
JDGFoqgCWjBH4d1QB7wCCZAA62RjYJsWvIjJEubSfZGL+T0yjWW06XyxV3bqxbYo
Ob8VZRzI9neWagqNdwvYkQsEjgfbKbYK7p2CNTUQ
-----END CERTIFICATE-----

For convenience, you can also paste the certificate above. Don't do this on sensitive websites though.


Then, execute GetSSL:

./getssl -u -a

Verify if your certificates are OK:

# openssl verify -CAfile /etc/letsencrypt/le.crt /etc/letsencrypt/example.org.crt
/etc/letsencrypt/example.org.crt: OK

Restart Apache:

# service httpd restart
Stopping httpd:                                            [  OK  ]
Starting httpd:

Finally, edit your PowerMTA config:

smtp-server-tls-certificate /etc/letsencrypt/example.org.crt
smtp-server-tls-ca-file /etc/letsencrypt/le.crt

<source 0/0>
    allow-starttls yes
    require-starttls-before-auth yes
</source>

Reload PowerMTA:

# service pmta restart
Stopping PowerMTA:                                         [  OK  ]
Starting PowerMTA:                                         [  OK  ]

Let's Encrypt's certificate expires every 90 days, so you need to update your crontab:

# crontab -e

Insert the following line in the crontab:

0 0 1 * * /root/getssl/getssl -u -a

Remember to protect your private keys and set the appropriate permissions. Just leave a comment if I missed some steps.

Thursday, November 24, 2016

Let's Encrypt on RHEL 6.8

It's been almost 3 years since I've last posted in this blog. 2016 is almost over. I think I should make it a point to post regularly.

Anyway, I'd like to share something interesting. There's a certificate authority called Let's Encrypt that gives free certificates through an automated process. According to their website, they have a Python script called Certbot that fetches the certificates and updates your web server's configuration for you.

Usually, I just use StartSSL for project prototypes or paid certificates on production websites, so I'm pretty late on discovering this.

I'm currently tasked on setting up a server here in my work. The goal is to let others send information towards this server and automate the process of setting up PowerMTA configuration based on this information. The most straightforward and relatively secure way to do this is over HTTPS.

Problem: The particular server that I'm working on runs on Red Hat Enterprise Linux 6.8, and Certbot needs updated Python packages to run. After a couple of attempts to solve this, I realized that it's a lost cause so I abandoned it and looked for a more lightweight solution with little dependencies. The best client that I've found so far is GetSSL. It's a straightforward bash script, and I like it!

The server that I'm working on runs on Apache, but I can't find any step-by-step documentation on how to use GetSSL with Apache. Thus, I decided to make one.

First, download GetSSL to your box:

# curl --silent https://raw.githubusercontent.com/srvrco/getssl/master/getssl > getssl

# chmod 700 getssl

Then, generate the default config files:

# ./getssl -c example.org

Making domain directory - /root/.getssl/example.org
creating domain config file in /root/.getssl/example.org/getssl.cfg

Edit the global config at: ~/.getssl/getssl.cfg. Pay particular attention to the following line:

RELOAD_CMD="service httpd reload"


Depending on your system, it can be service apache2 reload or something similar. Update as necessary.

Then, edit the domain config at: ~/.getssl/example.org/getssl.cfg and insert the following lines:


SANS=www.example.org
DOMAIN_CERT_LOCATION="/etc/httpd/getssl/example.org.crt"
DOMAIN_KEY_LOCATION="/etc/httpd/getssl/example.org.key"
DOMAIN_CHAIN_LOCATION="/etc/httpd/getssl/example.org-chain.crt"
CA_CERT_LOCATION="/etc/httpd/getssl/le.crt"
SERVER_TYPE="https"
CHECK_REMOTE="true"
ACL=('/var/www/.well-known/acme-challenge'
     '/var/www/.well-known/acme-challenge')

Adjust the paths as necessary.

The ACL variable above is the path for the Automatic Certificate Management Environment (ACME) challenge. It should point to a folder inside your web server's document root and should be accessible to the public via HTTP. The ACME challenge is used to prove that you control the web server.

Finally, edit the Apache config and insert this in your SSL section:


SSLCertificateFile /etc/httpd/getssl/example.org-chain.crt
SSLCertificateKeyFile /etc/httpd/getssl/example.org.key
SSLCACertificateFile /etc/httpd/getssl/le.crt
Let's Encrypt's certificate expires every 90 days, so you need to update your crontab to automatically renew your certificate:

# crontab -e

Insert the following line in the crontab:

0 0 * * * /path/to/getssl -u -a -q

Save your changes and apply your changes:

service httpd reload

If everything is OK, go back to your global config at ~/.getssl/getssl.cfg and uncomment the following line to use the non-staging server:

CA="https://acme-v01.api.letsencrypt.org"

Then, reload Apache again:

service httpd reload

That's it! Your web server is now running HTTPS. This won't really protect you from being particularly targeted by the NSA (there was a couple of state-sponsored attacks on certificate authorities), but the goal is to make broad mass-surveillance uneconomical. Just leave a comment if I missed some steps. Enjoy, and encrypt all the things!

Tuesday, February 25, 2014

Aws\Ses\SesClient\sendRawEmail() needs base64

Problem: You need to send raw e-mails to Amazon SES using the official PHP AWS-SDK, but Aws\Ses\SesClient\sendRawEmail() doesn't work even though your raw text is correct.

Solution: Encode your data in base64. Had to check their sample Perl script just to discover this. :-/

Working example:
<?php

require 'AWSSDKforPHP/aws.phar';

use Aws\Ses\SesClient;
$client = SesClient::factory(Array(
    'key     => 'foobar',
    'secret' => 'foobarsecret',
    'region' => 'us-east-1'
));


$data =<<EOD
From: "Example" <user@example.org>
To: "Simon Cornelius P. Umacob" <simoncpu@simoncpu.example.org>

hello world!
EOD;


$tmp = $client->sendRawEmail(Array(
    'Source'        => 'user@example.org',
    'Destinations'  => Array('simoncpu@simoncpu.example.org'),
    'RawMessage'    => Array(
        'Data' => base64_encode($data)
    )
));

var_dump($tmp);

?>

Tuesday, February 21, 2012

Kohana nested SELECT statment

Problem
You need to join two tables using a nested SELECT statement.  However, Kohana's Database module doesn't really allow this query:
mysql> select forum_categories.*, (
    ->     select count(forum_data.id)
    ->     from forum_data
    ->     where forum_data.category_id = forum_categories.id and
    ->     forum_data.parent_id = '0'
    -> ) as cat_count
    -> from forum_categories;
+----+----------------+------------------------+-----------+
| id | title          | description            | cat_count |
+----+----------------+------------------------+-----------+
|  1 | Category One   | category 1 description |         2 |
|  2 | Category Two   | category 2 description |         2 |
|  3 | Category Three | category 3 description |         0 |
|  4 | Category Four  | category 4 description |         0 |
|  5 | Category Five  | category 5 description |         1 |
|  6 | Category Six   | category 6 description |         0 |
+----+----------------+------------------------+-----------+
6 rows in set (0.01 sec)

Solution
Rewrite your query as a left outer join (or inner join, depending on your case):
mysql>  select forum_categories.*, ifnull(forum_data.total, 0) as total
    ->   from forum_categories
    ->   left join (
    ->       select category_id, count(forum_data.id) as total
    ->       from forum_data where parent_id = '0'
    ->       group by category_id
    ->   ) as forum_data
    ->   on forum_data.category_id = forum_categories.id;
+----+----------------+------------------------+-------+
| id | title          | description            | total |
+----+----------------+------------------------+-------+
|  1 | Category One   | category 1 description |     2 |
|  2 | Category Two   | category 2 description |     2 |
|  3 | Category Three | category 3 description |     0 |
|  4 | Category Four  | category 4 description |     0 |
|  5 | Category Five  | category 5 description |     1 |
|  6 | Category Six   | category 6 description |     0 |
+----+----------------+------------------------+-------+
6 rows in set (0.01 sec)

Translating to Kohana, we now have:

$subquery = DB::select('category_id', array('COUNT("forum_data.id")', 'total'))
 ->from('forum_data')
 ->where('parent_id', '=', '0')
 ->group_by('category_id');

$query = DB::select('forum_categories.*', array('IFNULL("forum_data.total", 0)', 'total'))
 ->from('forum_categories')
 ->join(array($subquery, 'forum_data'), 'LEFT')
 ->on('forum_data.category_id', '=', 'forum_categories.id')
 ->as_object()
 ->execute();

For more info, check out the Subqueries section of Kohana's Query Builder documentation.

Thursday, October 13, 2011

So long, farewell, and thanks for all the fish!

#include <stdio.h>

int main(void)
{
    printf("Goodbye world... :( \n");

    return 70;
}

Saturday, July 30, 2011

HOWTO Remove the annoying floating ads from Gmail's Preview Theme

Problem
Gmail's Preview Theme without floating ads.
You switched your Gmail theme, and you find the floating advertisement annoying.

Solution (for Chrome)
Modify Gmail's stylesheet to prevent the ads from floating.
  1. Install the Personalized Web Chrome extension.
  2. Go to Tools -> Extensions.
  3. Find the Personalized Web section and click "Options".
  4. Click "Add New Rule".
  5. In the "Match URLs" textbox, input "mail.google.com".
  6. In the "Add CSS" textbox, input:
    .mq {
        position: relative;
        bottom: 0px;
        left: 0px;
        margin: 0px;
    }
  7. Click "Save".
Reload Gmail to see the effect.

FAQ
Q: Why not just disable the advertisement in the first place?
A: Nothing in life is free; Google is providing us with this free service in exchange for displaying ads.  It's a fair deal.

Q: Does this work on Firefox?
A: No, but you can just google for steps on using a custom CSS.  You may use the same CSS from Step 6.

Required packages for building an Android OS on Ubuntu

Problem
You're trying to install the required packages for building a complete Android Operating System from scratch. Upon pasting the commands from the official documentation, you get the following error:

E: Couldn't find package lib32ncurses5-dev
E: Couldn't find package lib32readline5-dev
E: Couldn't find package lib32z-dev
E: Couldn't find package mingw32


Solution
The list of required packages for building an Android OS is wrong. The correct packages are:

sudo apt-get install git-core gnupg flex bison gperf build-essential \
zip curl zlib1g-dev libc6-dev lib64ncurses5-dev \
x11proto-core-dev libx11-dev lib64readline5-dev lib64z-dev \
libgl1-mesa-dev g++-multilib tofrodos


Note: This has been tested on Ubuntu 10.04 (Lucid Lynx). YMMV.

Wednesday, March 16, 2011

Downgrading from PHP 5.3 to 5.2 on Debian Squeeze

Problem

You've installed PHP 5.3 on your Debian Squeeze system. Problem is, some web apps have trouble running on that version. You need to downgrade your system from 5.3 to 5.2.

Solution

Remove the PHP 5.3 packages from your system:
sudo aptitude purge `dpkg -l | grep php| awk '{print $2}' |tr "\n" " "`
Clean the cache just to be sure:
rm -f /var/cache/apt/archives/php5*
Use Karmiс for PHP packages:

echo -e "Package: php5\nPin: release v=karmic\nPin-Priority: 991\n" | sudo tee /etc/apt/preferences.d/php > /dev/null
apt-cache search php5-|grep php5-|awk '{print "Package:", $1,"\nPin: release v=karmic\nPin-Priority: 991\n"}'|sudo tee /etc/apt/preferences.d/php > /dev/null
Add Ubuntu Karmic to source list:

cd /etc/apt/sources.list.d
sudo wget -O karmic.list "http://pastebin.com/download.php?i=q9ya307g"
(Update, October 18, 2012: The sources list has been updated, because Ubuntu no longer supports Karmic. Please leave a comment if this still doesn't work.)

Update the package database:
sudo apt-get update
If the command above produces this error:

W: GPG error: http://security.ubuntu.com karmic-security Release: The following signatures couldn't be verified because the public key is not available: NO_PUBKEY 40976EAF437D05B5
W: GPG error: http://archive.ubuntu.com karmic Release: The following signatures couldn't be verified because the public key is not available: NO_PUBKEY 40976EAF437D05B5
W: GPG error: http://archive.ubuntu.com karmic-updates Release: The following signatures couldn't be verified because the public key is not available: NO_PUBKEY 40976EAF437D05B5
Then import the required keys and add them to your list of trusted keys:

gpg --keyserver hkp://subkeys.pgp.net --recv-keys 40976EAF437D05B5
gpg --export --armor 437D05B5 | sudo apt-key add -

gpg --keyserver hkp://subkeys.pgp.net --recv-keys 40976EAF437D05B5
gpg --export --armor 40976EAF437D05B5 | sudo apt-key add -

gpg --keyserver hkp://subkeys.pgp.net --recv-keys 40976EAF437D05B5
gpg --export --armor 40976EAF437D05B5 | sudo apt-key add -
Finally, install PHP 5.2:
sudo apt-get install -t karmic php5-cli php5-cgi libapache2-mod-php5
UPDATE: Using the Ubuntu sources to download old packages works on Debian. So far, it works on my system, but you may need to use the Debian sources just in case.

Thursday, August 05, 2010

I hate Linux part 2

OK, I was able to run SystemRescueCd's USB creator by running it in Ubuntu Lucid. The USB stick booted, but when I ran GParted, it wasn't able to detect the RAID array.

Linux = FAIL.

The point of this exercise was to run GParted in order to resize our FreeBSD's /usr partition to make way for ZFS. I allocated around ~400GB of space to that partition, but I realized that it's better to use that space for ZFS since I'll be using it for jails.

FreeBSD jails + ZFS = WIN.

I'll just copy /usr to /var, resize it, and move back /usr to the new partition. I hope this works.


(this is probably GParted's fault, but I love to troll hahaha)

Tuesday, August 03, 2010

I hate Linux


Yet another reason why I hate Linux:

SystemRescueCd, a Linux distro designed for administering or repairing a system, doesn't boot and stops with the following error:

!! Cannot find device with /sysrcd.dat. Retrying...

After a bit of googling, it turns out that this occurs because Linux can't detect the USB CD-ROM that was used to boot it. This use case isn't QA'd anymore. Apparently, the solution is to use a USB stick instead.

But what happens if you use a USB stick? It doesn't work:

[root@soulfury mnt]# mount -o loop,exec ~simoncpu/Desktop/systemrescuecd-x86-1.5.8.iso cdrom
[root@soulfury mnt]# cd cdrom
[root@soulfury cdrom]# ls
bootdisk bootprog isolinux ntpasswd sysrcd.dat sysrcd.md5 usb_inst usb_inst.sh usbstick.htm version
[root@soulfury cdrom]# bash usb_inst.sh
No valid USB/Removable device has been detected on your system

I checked the usb_inst.sh source code, and it makes some invalid assumptions on what a USB stick is. Blah. I need to sleep.

Monday, July 26, 2010

FreeBSD: Unable to find device node for dev /dev/ar0s1b in /dev

Problem:
Sysinstall can't continue and stops with the error, "unable to find device node for dev /dev/ar0s1b in /dev".

Solution:
Remove the existing partition table by writing zeros at the start of the disk:
dd if=/dev/zero of=/dev/ar0 bs=64k count=1
(replace as necessary, e.g., ad0)

Saturday, July 17, 2010

Apache: Restricting folders by IP addresses

1st Problem:
You are running an Apache server. You need to restrict access to certain folders by IP addresses.

Solution to 1st problem:
Use .htacess to deny all access to that folder, then allow certain hosts/IP addresses.

AuthName "simoncpu's dark secret"
AuthType Basic

<Limit GET POST>
order deny,allow
deny from all
allow from 10.0.0.
allow from .example.org
allow from this.is.an.example.invalid
</Limit>

2nd Problem:
Your Apache is behind a proxy such as nginx. All requests to your Apache server appear to originate from your proxy.

Solution to 2nd problem:
Install mod_rpaf and restart your web server. .htaccess will now correctly restrict access to your folders.  Refer to its web page for installation instructions.